Data Engineering
The Data engineering section (icon bar, key general.dataEngineering) has exactly two sub-links that let you manage database objects without working directly in the database:
- Materialized views (
/dataengineering/materializeviews, from v1.57): materialize views into tables. Up to and including v1.56 this sub-link is called View persistence (/dataengineering/viewpersistence). - Database objects (
/dataengineering/objecthistory) — the object viewer: the object tree, the current SQL definition, version comparison and the right-click menu for adding objects to a change.
The full list of app screens with their route and fields is in Web app screens.
Materialized views
A materialized view stores the result of a view query in a real table. Reports then read directly from a table and a (possibly slow) view doesn't have to be recomputed every time.
From v1.57 a materialized view is a regular source: a registered table under the internal source dwh. It loads through the same engine as any other table and therefore gets the same load types, history, deltas and monitoring. The Materialized views screen is built around that. You manage the views there with the same wizard as a used table, and you start the Materialize View pipeline from it.
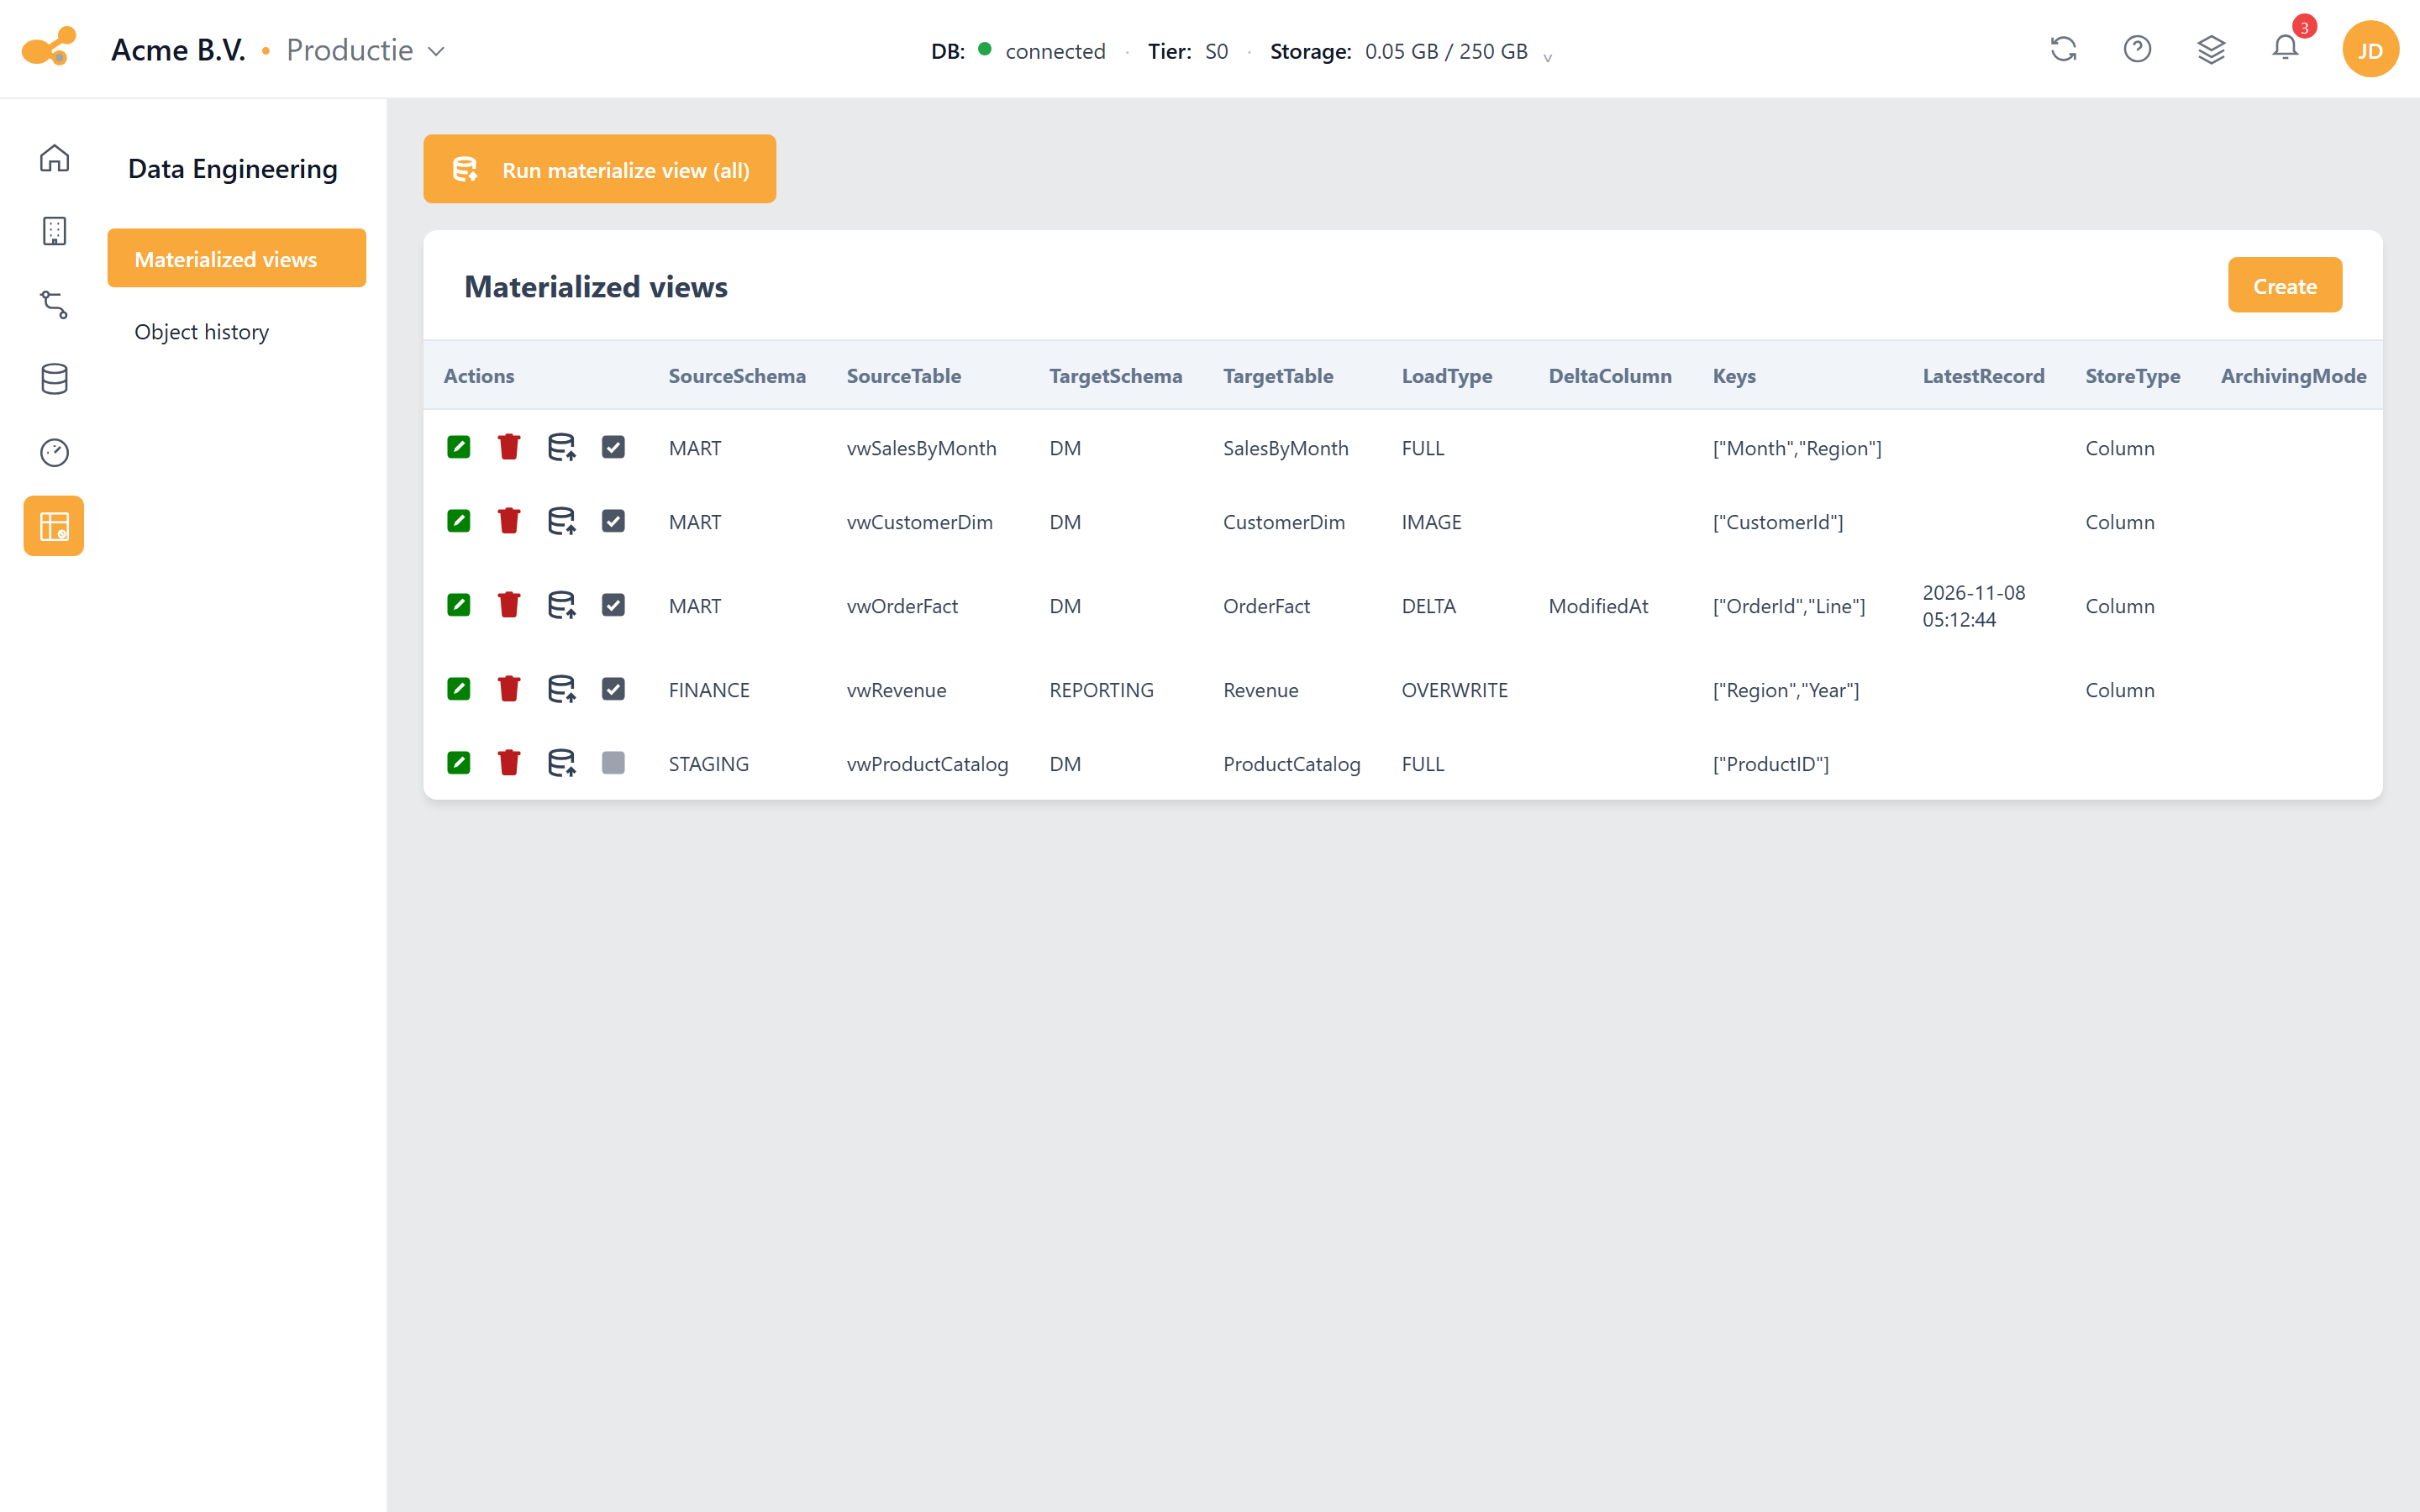
The Materialized views screen (from v1.57): per view the source, the target and the load settings. The last row is deactivated and therefore shows an empty box.
For each view the table shows:
| Column | Meaning |
|---|---|
SourceSchema · SourceTable | The schema and name of the view you materialize. |
TargetSchema · TargetTable | Where the materialized table lands. |
LoadType · DeltaColumn | The load type and, for a delta load, the delta column. |
Keys | The key columns. |
LatestRecord | The last loaded value of the delta column; empty for a load without a delta column. |
StoreType | How the table is stored. |
ArchivingMode | The archiving mode, if one is set. |
The icon in the row shows whether a view is active. The actions:
- Create: register a new view (see below).
- Run materialize view (all): button above the table; starts the Materialize View pipeline for all views. It appears as soon as that pipeline exists in the Data Factory.
- Run materialize view: row action that fills in the pipeline parameters Schema and Table and opens the ad-hoc runner, so you materialize a single view.
- Activate / deactivate: row action to switch materializing a view off for a while, or back on.
- Update and Delete: edit or remove a registration, just as for a used table.
Who may do what is governed by the same permissions as before (viewpersistence).
Registering a view
- Click Create.
- If you have several environments, choose the project and the change.
- Choose the schema and the view (field table). You see your own views that are not registered yet; Yres's own views are not among them. The data platform is fixed to Data Warehouse.
- Choose the columns.
- Choose the load type:
FULL,DELTA,DELTAIMAGE,IMAGE,OVERWRITEorRELOAD. ForDELTAandDELTAIMAGEyou specify the delta column. - Choose the key. A view declares no key; without an explicit choice, all
NOT NULLcolumns together form the key. ForIMAGE,DELTAIMAGEandDELTAthe screen recommends choosing the key yourself, so that every change ends up cleanly in the history as a new version of the same record. - Go through the additional options and the archiving step.
- Fill in Target schema and Target table. For a new registration both are required and the table name must be unique across all registrations. When editing, leave them empty to keep the current target, or fill in both to move the table. For reference, the step shows the STAGE Target and the HIS Target.
- Save and materialize with Run materialize view.
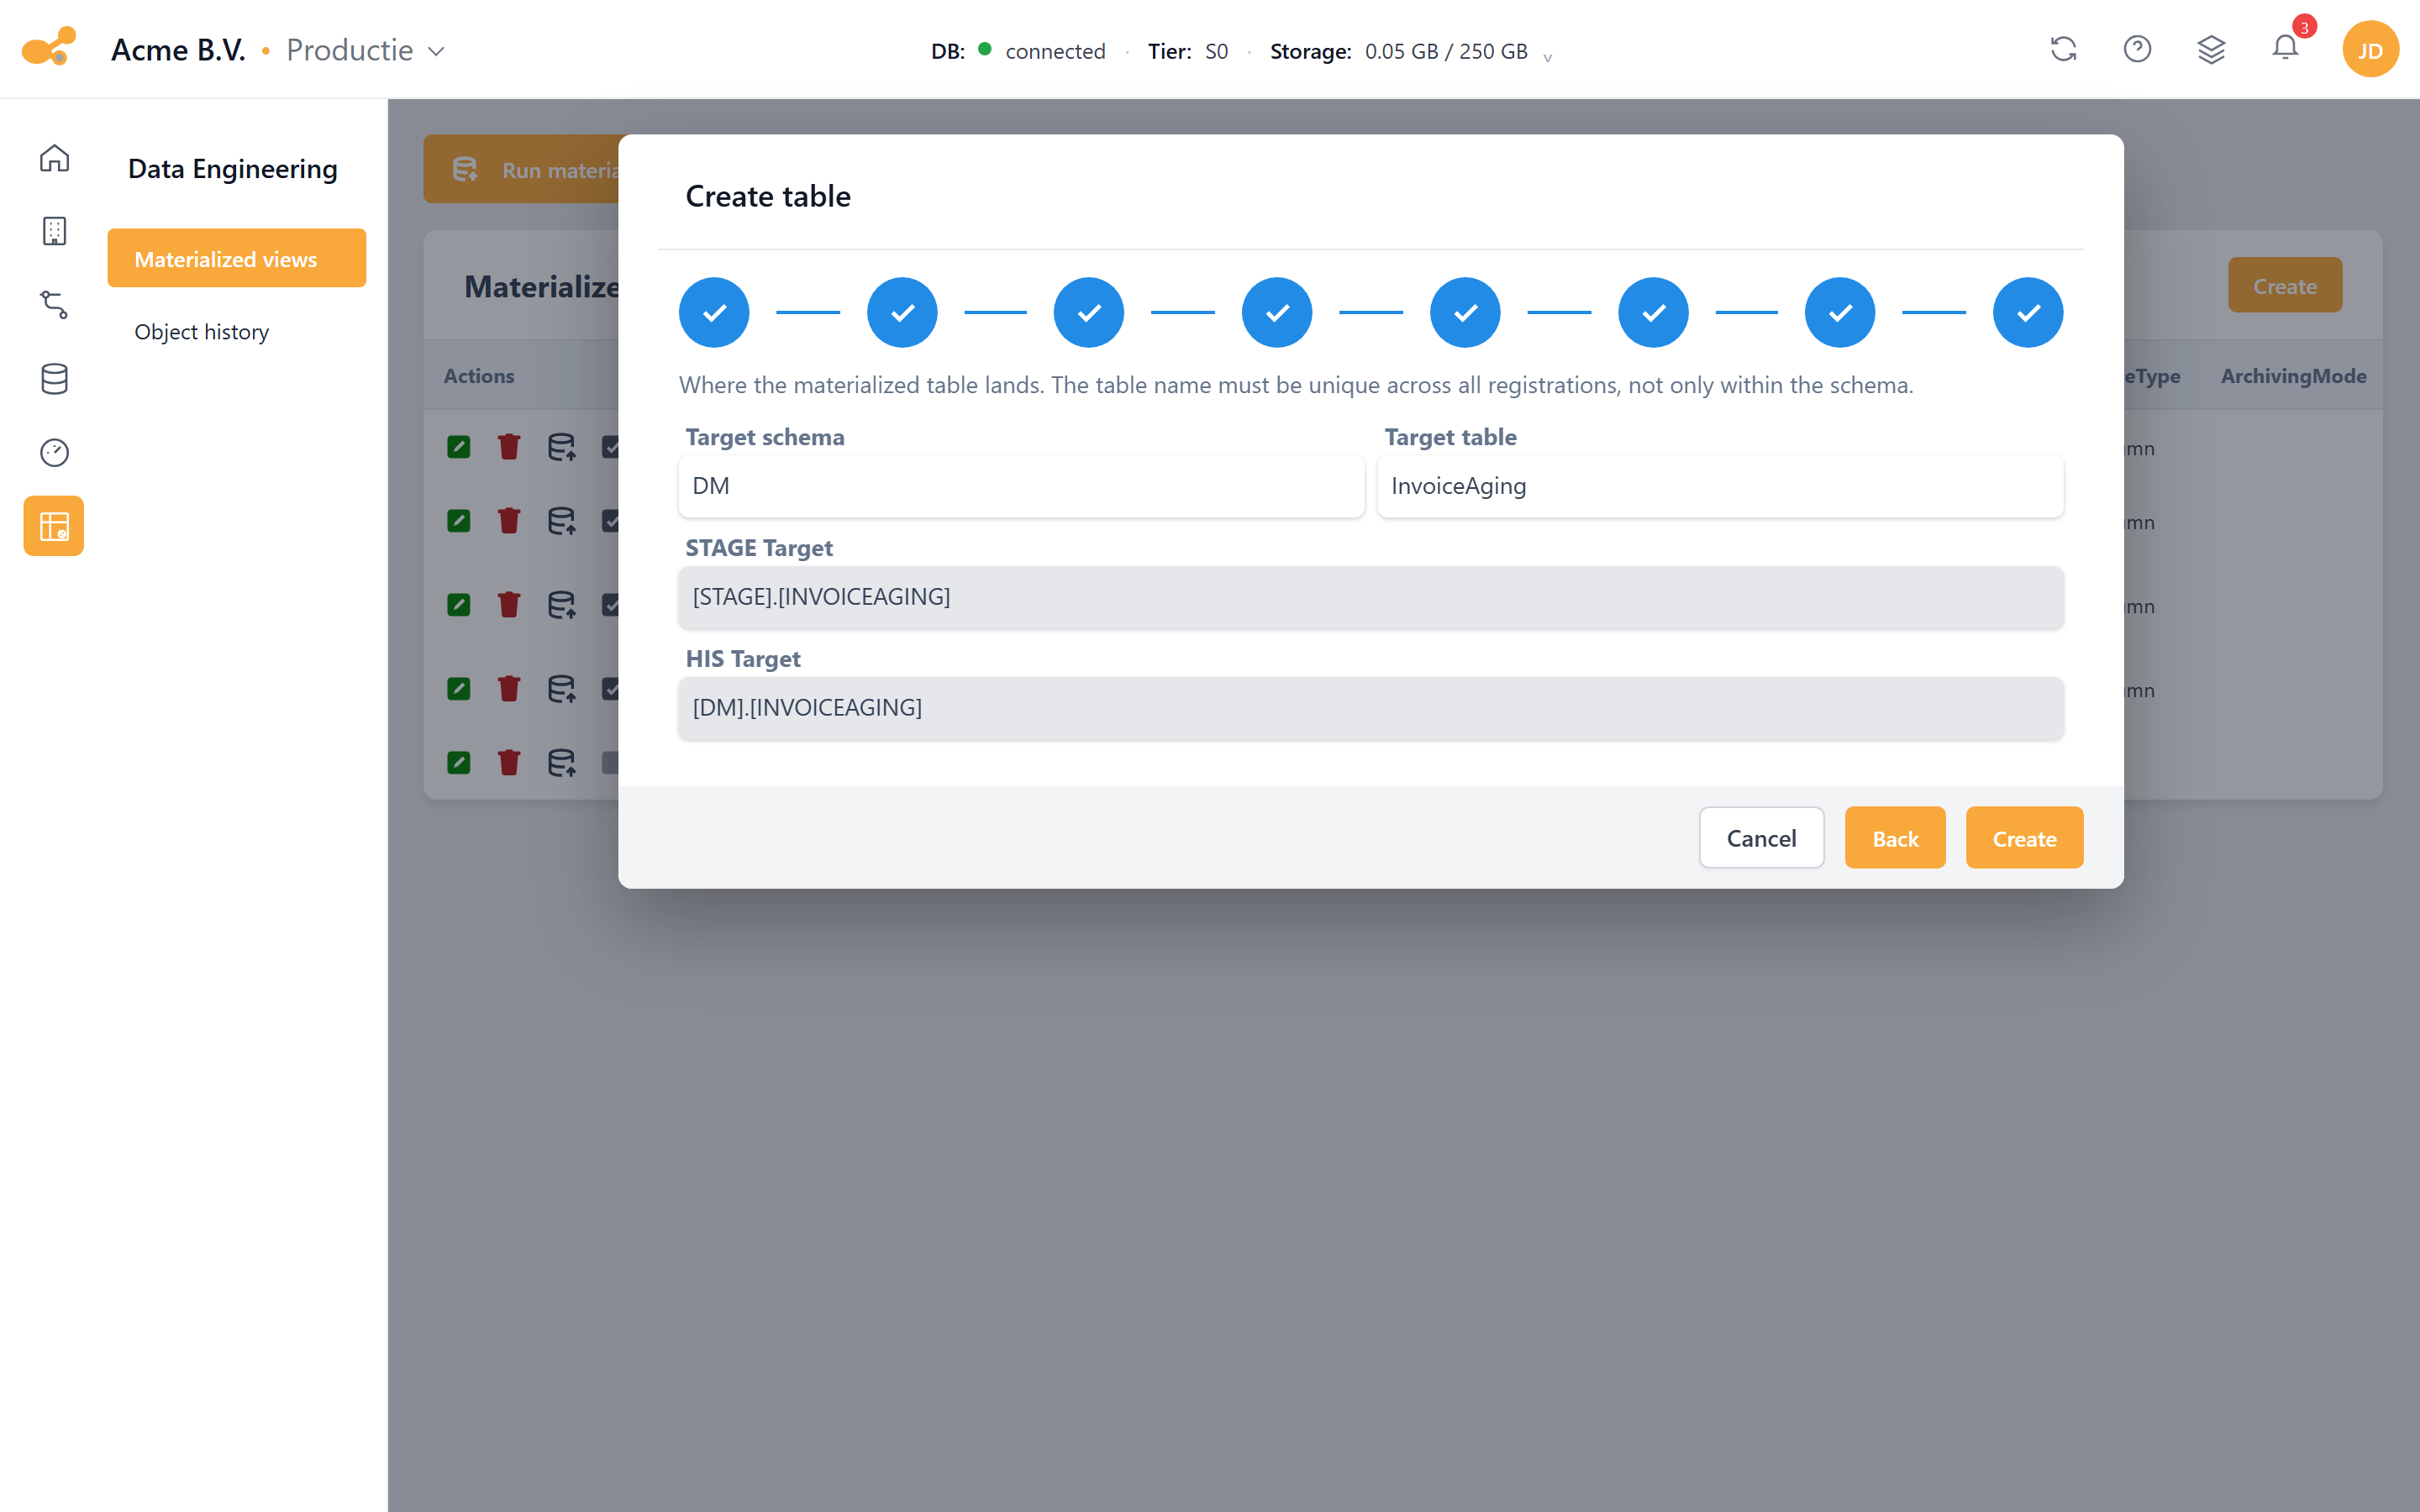
The target step of the wizard: you choose the schema and table name yourself. You pick the view itself earlier, in the schema and table step.
Order
If one view reads from the materialized table of another, Yres loads the source view first. Yres derives that order from the dependencies between the views; you don't have to set it yourself.
The screen stores the registration through spMaintainTable under source dwh (source type INTERNAL), with the target as OverwriteSchema/OverwriteTable. The list of views comes from [LoadManagement].[vwCatalog]. The materialization is done by [LoadManagement].[spMaterializeViews], called by the Materialize View pipeline: for each view the result goes to STAGE, after which spLoadDWH performs the merge into the history layer. The same step (Materialize Views) also runs at the end of the load workflow. See Views & pipelines for the walkthrough and the conversion during the upgrade.
View persistence (up to and including v1.56)
On v1.56 and older this is the View persistence screen (/dataengineering/viewpersistence). It reads from Loadmanagement.vwViewPersistence.
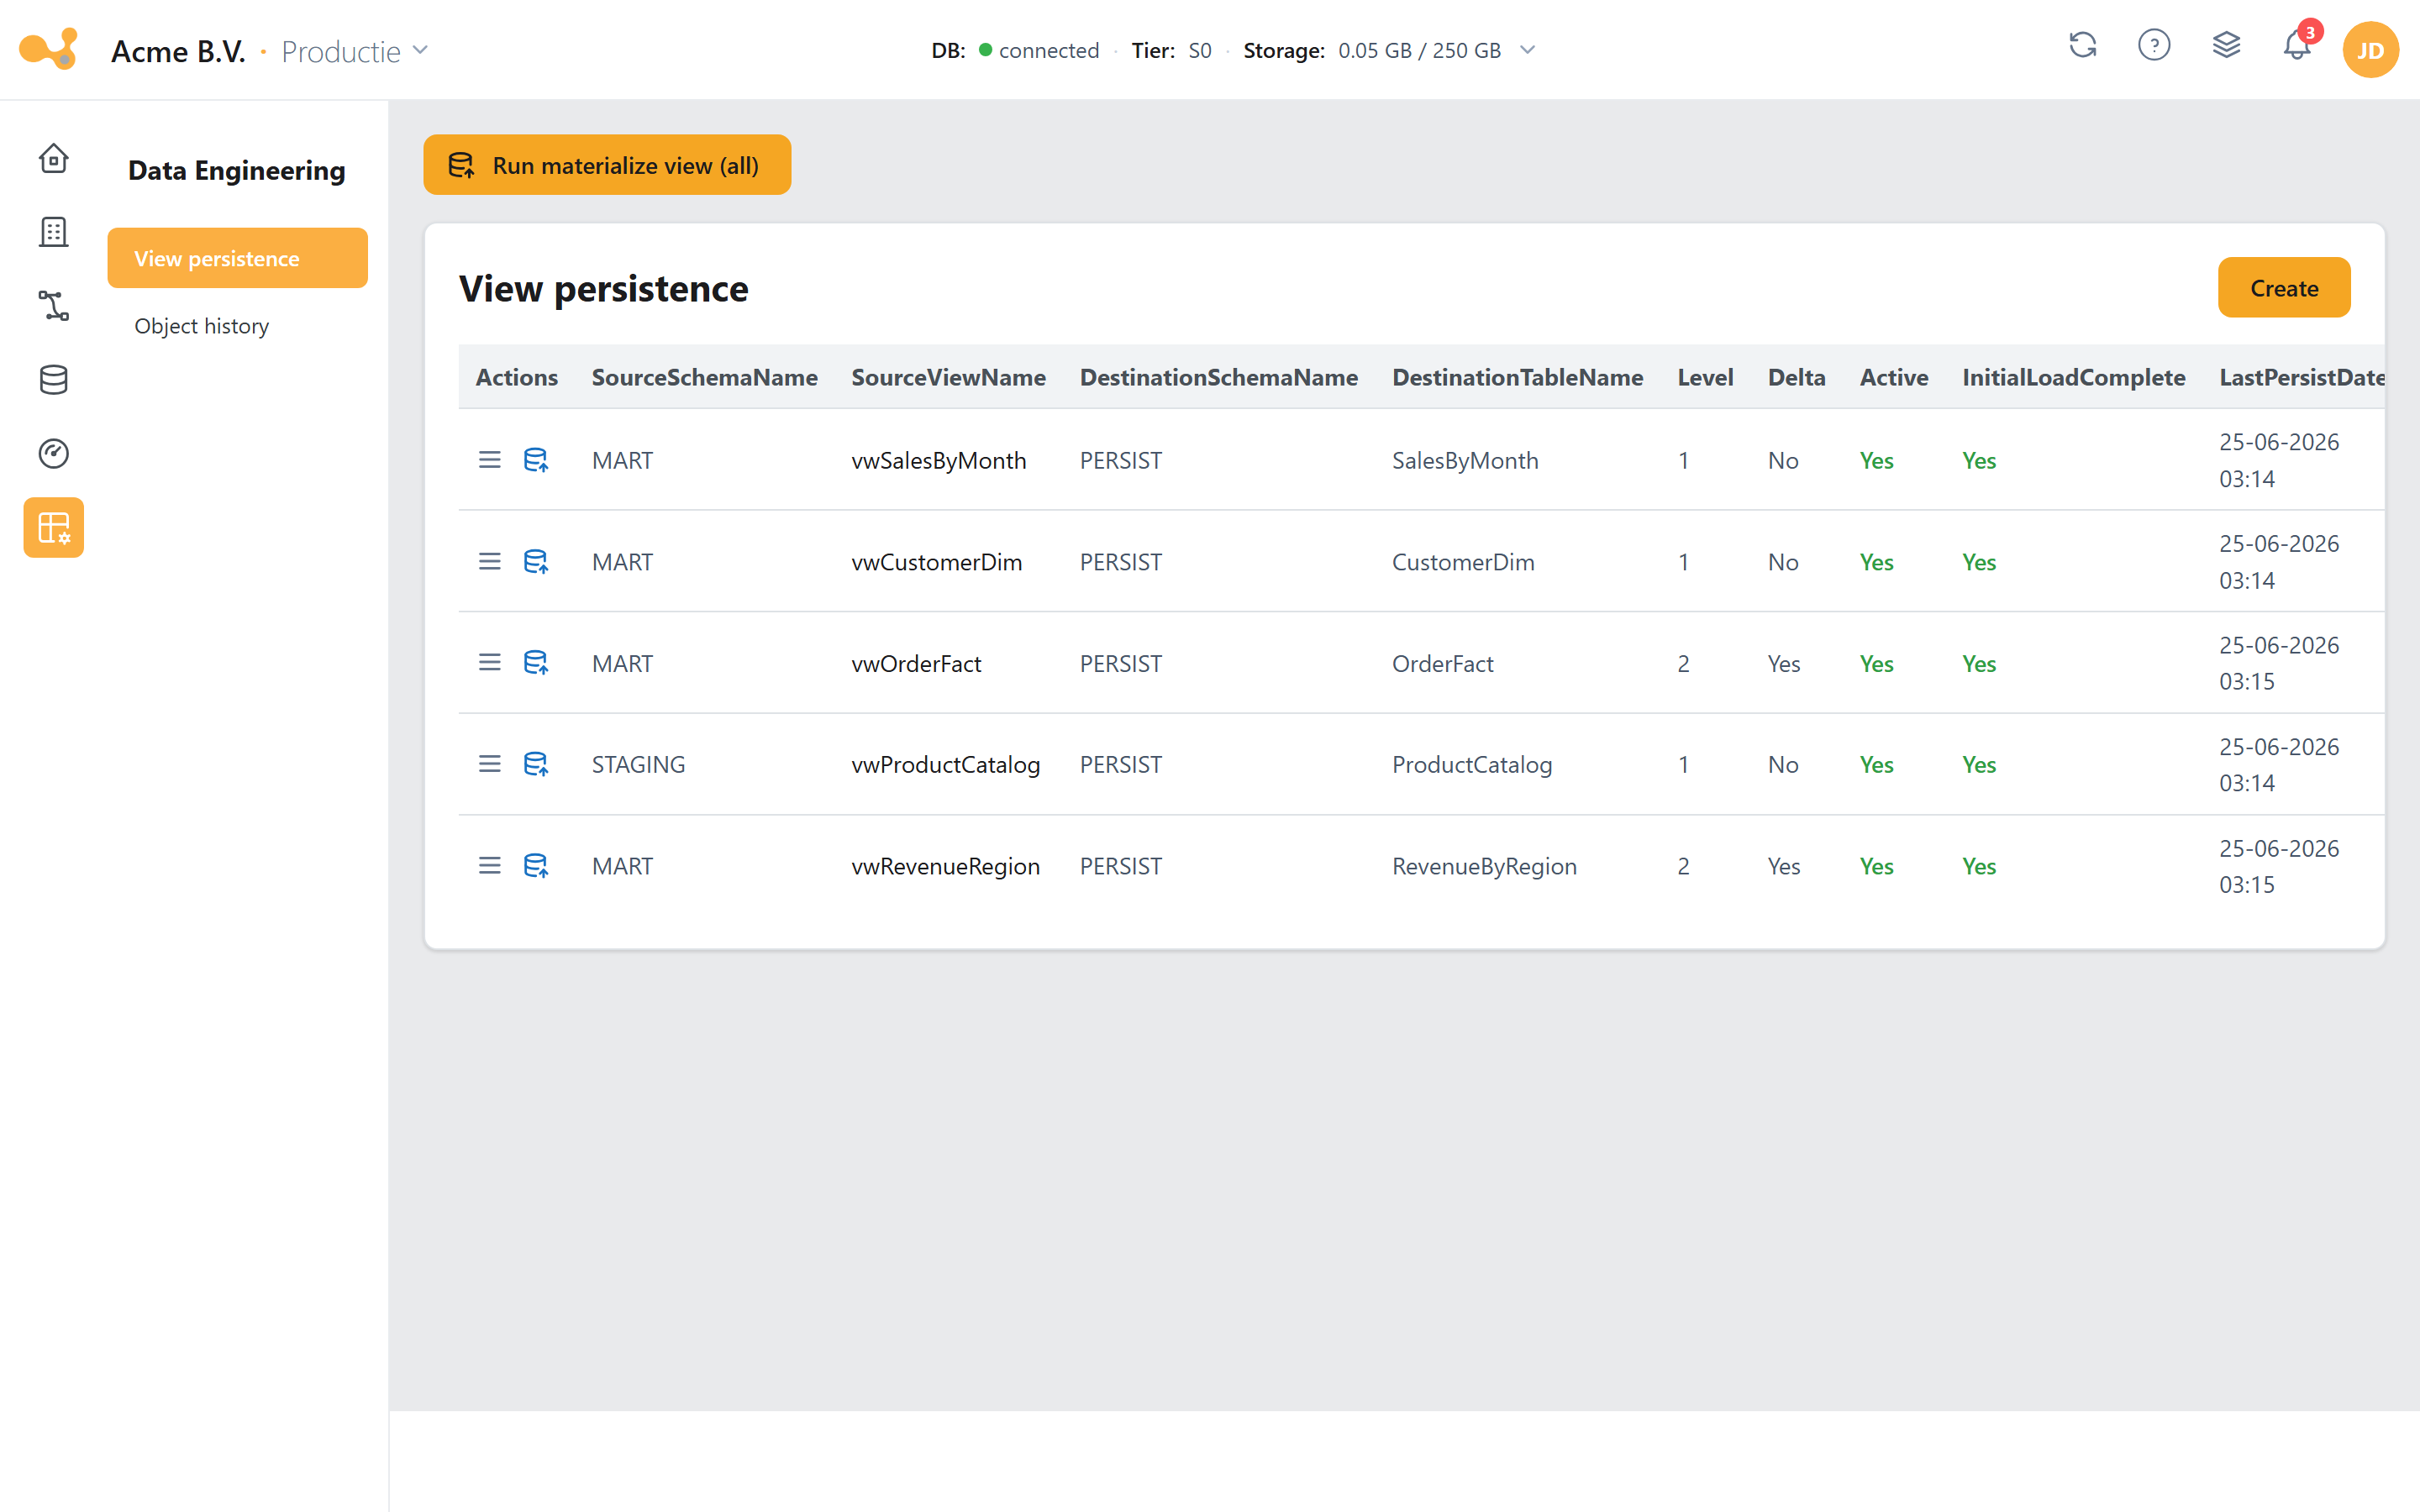
The View persistence screen (up to and including v1.56): the persistence table with the create form below it.
For each persisted view the table shows, among others, SourceSchemaName, SourceViewName, DestinationSchemaName, DestinationTableName, Level, Delta, LastPersistDate, LastETLDate and Active. With + Add persisted view you choose the source view, the destination table, a Level and a load type:
- Level determines the order. If view B depends on view A, give A
Level 0and BLevel 1; views with a lower level are processed first. - Full materializes the whole view again on every run. Delta updates only changed records, tracked through a source object (view or table) and a
DeltaColumn.
The configuration is stored through MaintainPersistView. You materialize with Run materialize view (per row) or Run materialize view (all).
Database objects
The Database objects sub-link (/dataengineering/objecthistory) is the object viewer: a tree of all database objects — created by a user and by Yres — where you inspect each object's current SQL definition, compare versions and use a right-click menu to add objects to a change.
This screen is the home for your scripted/custom objects (your own tables, views, stored procedures and functions). You browse your DWH objects here and add a custom object — or an existing database object — to a change directly via the right-click menu (Add to change). There is also a separate Scripted objects screen (/loadmanagement/scriptedObjects, via the sidebar link under Projects); the right-click menu here in Database objects is the quickest way to add an object to a change.
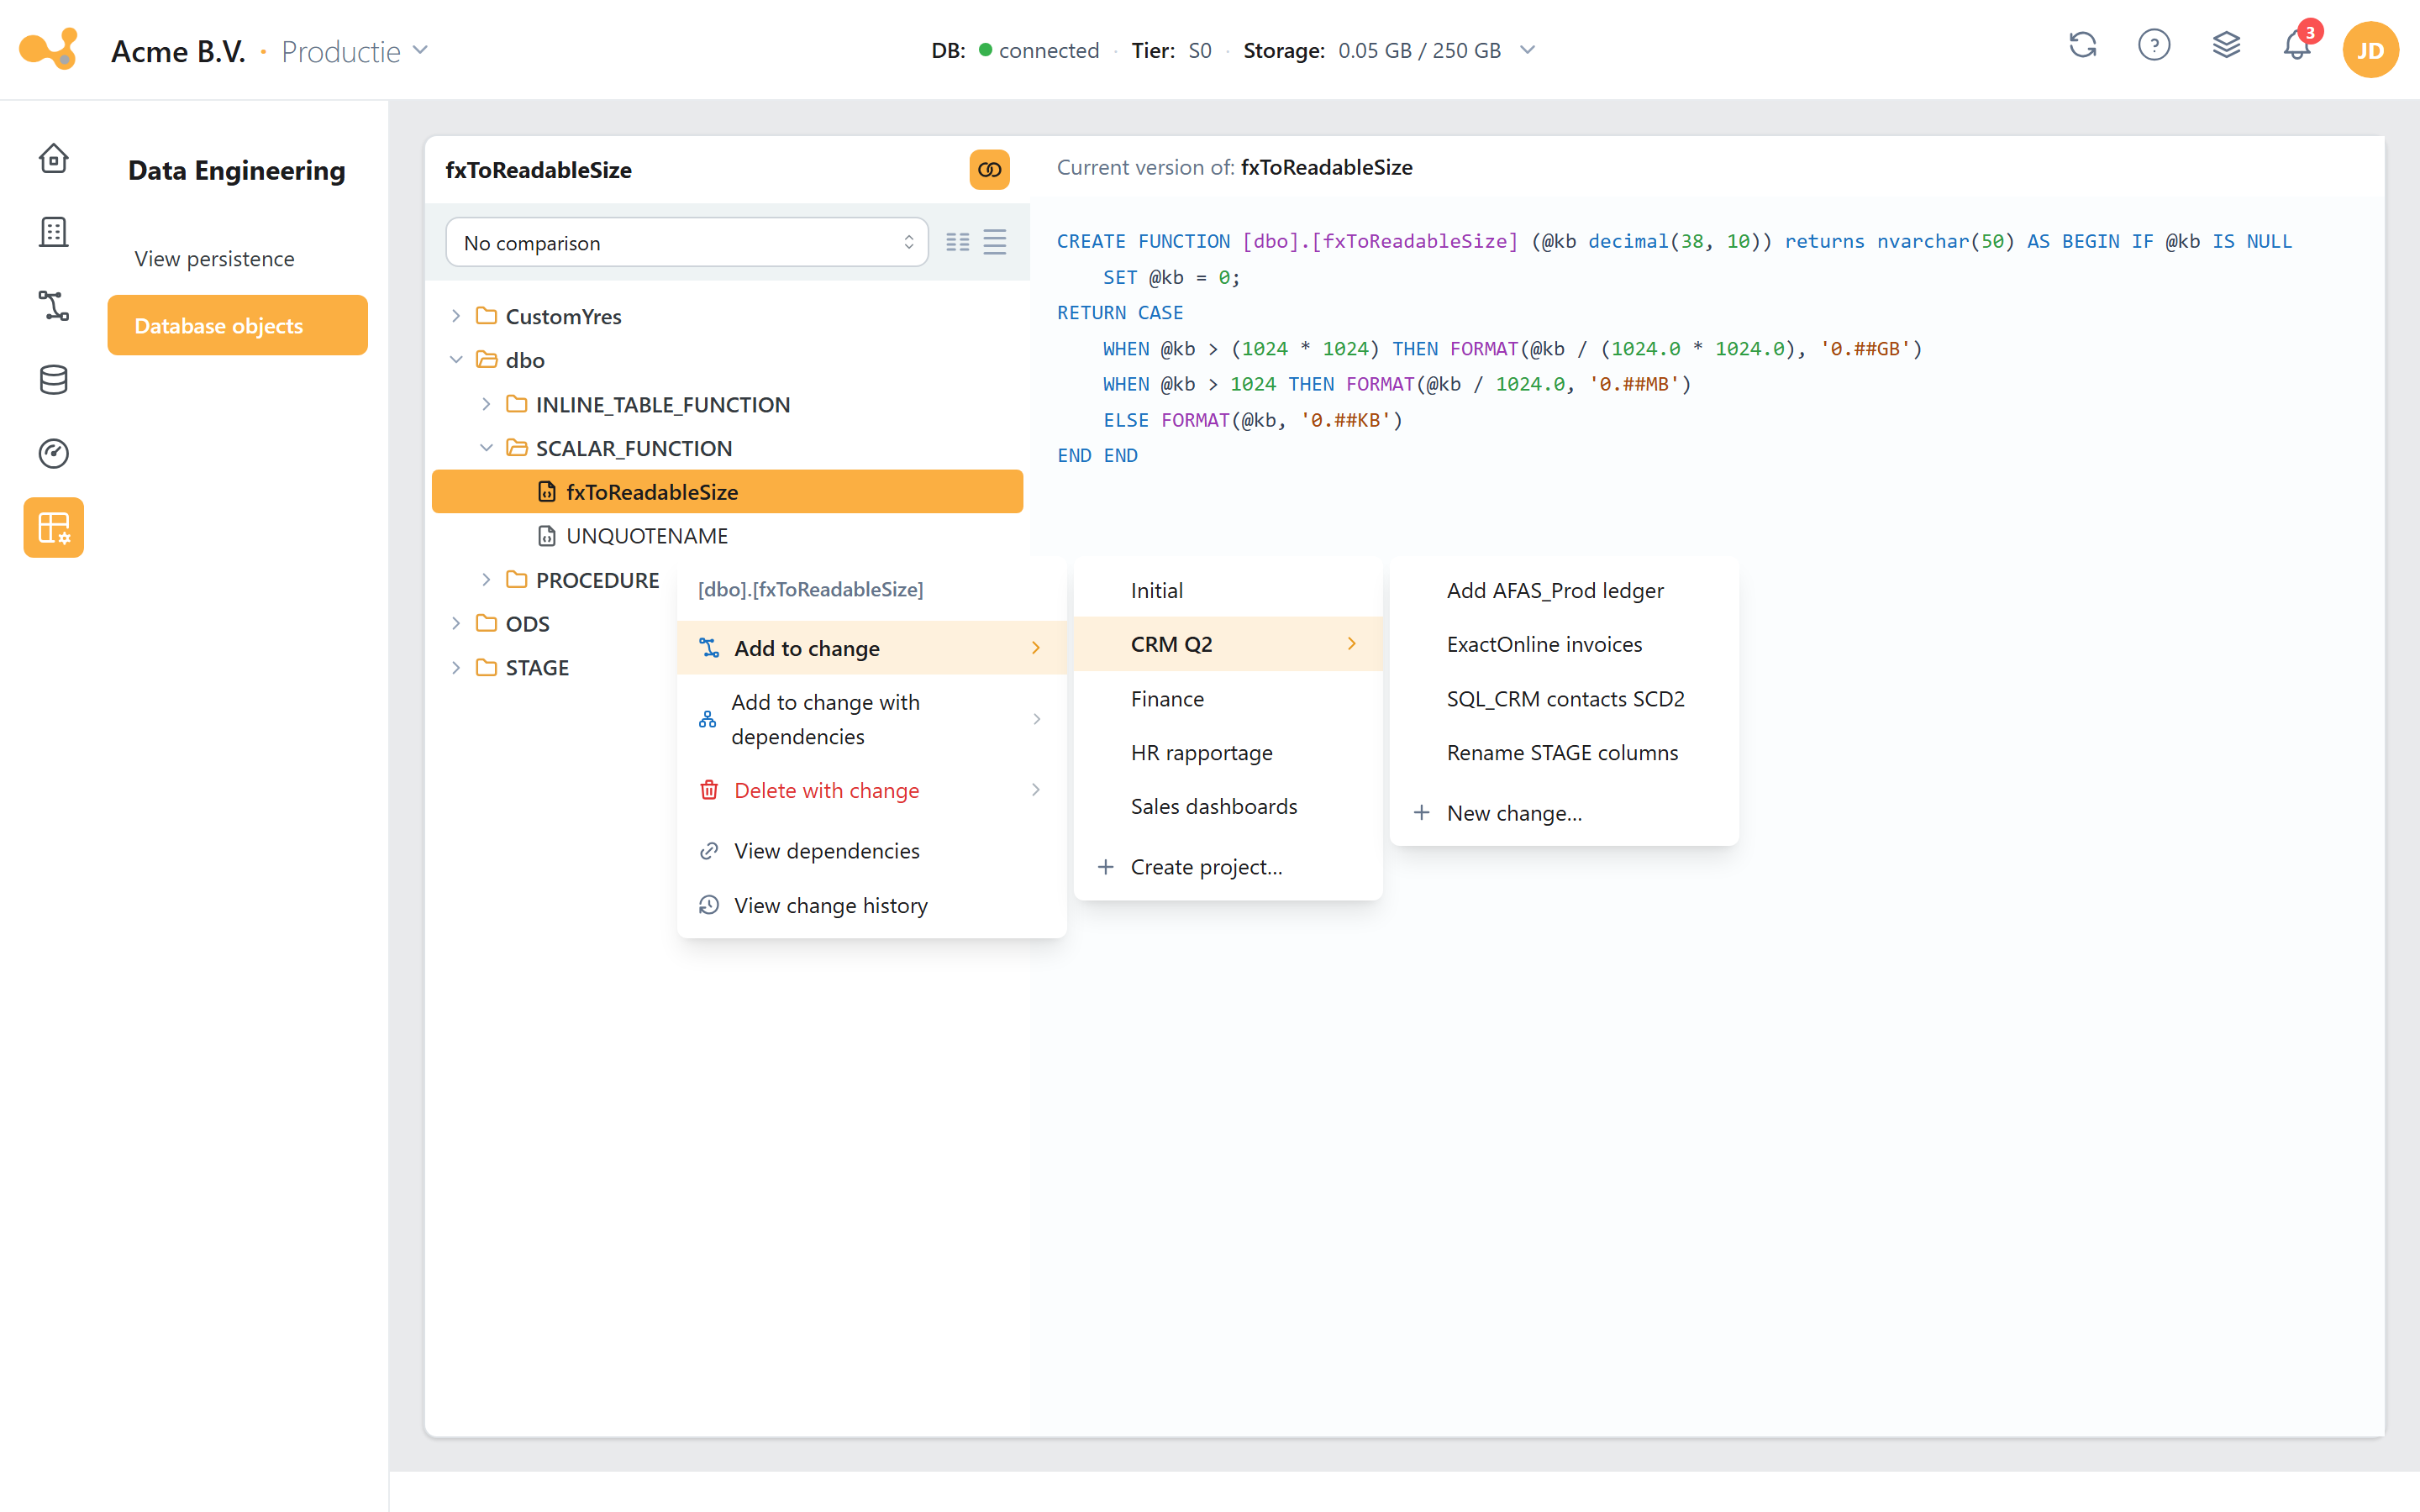
The Database objects screen: the object tree on the left (schema → object type → object), the source pane with the current definition in the middle, the comparison dropdown at the top, and the right-click context menu with the Add-to-change cascade.
(1) Object tree — three levels: schema → object-type folder → object. For example dbo → SCALAR_FUNCTION → fxToReadableSize, or ODS → TABLE → AzureSQL_dbo_attractions. Click an object to load its definition.
(2) Source pane — shows the current SQL definition of the selected object, syntax-highlighted.
(3) "No comparison" / "Compare versions" dropdown (+ layout toggles) — at the top; defaults to "No comparison". Choose Compare versions for a diff; for organizations with multiple environments there is a third option, Compare environments, which compares the definition across environments.
(4) Version diff — with Compare versions selected, a red/green difference appears between the current version and a previous ALTER (added/removed columns, indexes, and so on).
(5) Right-click context menu — right-click an object for the change and dependency actions (see Adding objects to a change).
Comparing versions
- Select an object in the tree; the source pane shows the current SQL definition.
- Switch the dropdown at the top from No comparison to Compare versions.
- Read the red/green difference between the current version and the previous
ALTER: added lines are green, removed lines are red (for example added or removed columns or indexes). - Use the layout toggles to change how the source and diff panes are displayed.
Adding objects to a change
The right-click menu on an object in the tree is how you add scripted/custom objects — your own tables, views, stored procedures and functions — as well as existing database objects to a change. Right-click an object and choose one of the following actions (the first three have cascading submenus):
- Add to change ▸ — pick a project ▸ pick a change (or New change… / Create project…). The object is added to that change.
- Add to change with dependencies ▸ — the same project → change path, but also includes the object's dependencies.
- Delete with change ▸ — schedules the object's deletion as part of a change.
- View dependencies — opens a dependency graph (React Flow) of what the object depends on and what depends on it, for example
[dbo].[UNQUOTENAME]→[LoadManagement].[fxExtractor]→vwExtractor/spPrepareWorkload. - View change history — opens a modal listing the changes that touched this object (columns Change · Status overview · CreationDate · plus a link to navigate to the change).
Adding to a change is part of the Projects → Changes process, which promotes changes through your DTAP environments in a controlled way. This menu is meant for setups with multiple environments.
Further reading
- History & SCD2 — how Yres tracks history (KeyHash/RowHash,
ETL_Date/ETL_EndDate,IsCurrent,Delta); background on what the load type of a materialized view does with the history. - Load management — where you start individual pipelines, including Persist View (the Materialize Views pipeline).
- Data flow — where the Materialize Views step fits in the overall load workflow.